
I live in a country where people walk in with their shoes on! After five years in Belgium, I still haven’t adjusted to this habit. I come from Sweden and later I lived in Japan- people in the Nordic countries take their shoes off by the front door, so do the Japanese. For me; outside is outside and inside is inside. I don’t want the dirty ground outside on my floors and Belgian streets are d.i.r.t.y! Dog shit on the side walks, the garbage is left in bags on the streets where we walk and the bags often break so people walk in the garbage! Plus it rains constantly here, so what people actually bring in to my house on their feet is too awful for me to think about. We walk around in slippers or socks in our house. We have a basket of socks for visitors, but I don’t always dare to ask them to take their shoes off… Anyway, these slippers are so easy to make, and really cute! Once you’ve gotten the hang of how to make the pattern and how to put them together, you’ll have an entire basket full of them to give your own guests when they enter your house. Good luck!
What you will need:
* pattern paper
* pen
* an insole or ONE old slipper (for your foot shape) you will mirror it for a left and right foot.
* measuring tape
* sewing machine
* ruler
* outside fabric
* inside fabric
* some sort of padding; fleece or thick wool for example
How to make them:
Step one. Pattern.
1. First thing to do is to copy the base of some old slippers or an insole in one of your shoes (OR you can just draw your foot and calculate the pattern based on the measurements I show you here). This will be your sole pattern piece- the bottom.
2. Now we measure to make the top pattern piece: The top of my slipper is 8 cm and then 8 cm across, leaving a rectangular opening for the foot. Let’s move the measurements over to our bottom pattern piece. First, draw a line in the middle of the sole, splitting the sole in two parts, as centered as you can (as my old pattern-cutting professor used to say: “it’s not rocket science!”). Then draw the above measurement, 8x8cm dividing it around “the center line” or the grain line. We draw all this ON the bottom pattern piece, but that’s ok, we will copy them later! So far, what we’re doing now is called a master draft.
3. Next step is to measure the width of the top pattern piece. On the side of the slipper, I measured 3 cm from the sole to the opening around the phalanges. So we add 3 cm straight out on both sides and draw a nice curve from the center front (CF) to the phalanges (see the blue line above).
4. Next we measure the heel, in my case 6 cm. Then measure the length of the top pattern piece: measure from the center front (CF) to the center back (CB) of the sole and note down the measurement (here 31,5 cm for the outside of the foot and 32 cm for the inside). Draw support lines for the rectangular opening straight down, evenly along the line in the middle of the sole. Measure out from the phalanges, the length of the sides (31,5 cm and 32 cm) and draw out in an angle until you have an end piece of 6 cm (the heel). Always draw ends in an angle, that will avoid getting ugly points where to pieces have been stitched together.
voila! Our “masterdraft” 🙂 As you can see you can really just measure on your own foot (or Grandpa’s) and use the same calculations as I have shown here.
5. Ok, next and final step! Let’s make the real pattern pieces that you can use for slipper, after slipper, after slipper, after slipper….
sole pattern piece- the bottom: trace the black line of the master draft, marking out
center front (CF),
center back (CB) and
the side phalanges and
grain line (that line in the middle). You will need this markings to put the slippers together without to much fuss. Draw 1 cm
seam allowance around the entire sole.
Top pattern piece: Trace, following the blue line of the master draft and marking out the center front (CF) and another marking straight down CF on the opening rectangle (this will be the grain line), plus the phalanges. These markings will match up with the bottom sole pattern piece when sewing. The center back (CB) marking will be the seam on the heel. Add 1 cm seam allowance all over and curve out the rectangle.
Congratulations! You have made your pattern! Well done for your hard work, but it will pay back when you see the result! It’s a great satisfaction to make things yourself 🙂
Now make a nice little storage for your pattern (in a plastic pocket held in a pretty file holder perhaps?). Then have a break before we continue, maybe grab a cup of tea while you draw a nice design of your new slippers. You can put that in your plastic pocket together with nice fabric swatches!
⸌̷̻( ᷇ॢ〰ॢ ᷆◍)⸌̷̻♡⃛
Step two. Making up the slippers.
1. Cutting out pattern pieces in fabric is great with a sharp fabric scissor. All you have to think about is to follow the
grain line. My slippers will be striped, but on the upper foot pattern piece, I want the stripes to be horizontal, so I’m placing them crossing the grain line. It is totally ok to do this on plain woven fabrics. Many times this can save fabric and give cool patterned effects on the garment.
So how much do we need? We will need 2 slippers with lining and a layer of fleece in between, so let’s start with the main fabric:
2 slippers:
* 2 bottom sole (against the floor)
* 2 inside sole (against the foot)
* 2 fleece layer (in between the two, like a hamburger between buns)
* 2 upper foot (what you will look at 🙂
* 2 inside upper foot (against the foot)
* 2 fleece layer (in between the two, again, like a hamburger)
That gives us 4 sole pattern pieces and 4 upper foot pieces of the main fabric. So, fold the fabric right side to right side (that gives you 2 layers mirrored fabric = one slipper) and then fold it again (which gives you 4 layers of mirrored fabric, right side to right side = 2 slippers). Now pin down your pattern pieces.
Cut out along the pattern pieces and snip (a small cut) 0,5 cm with the scissor on the balance marks we’ve made on the pattern. Be careful not to snip to far in, cutting where our future seam will be.
2. I want these slippers lined with something warm, so I found an old fleece baby blanket that was perfect. Fleese has no grain line, so feel free to cut where you find space. You don’t have to worry about putting the pieces out mirrored on fleece. You need 2 upper foot pieces and 2 sole pieces. Mark out the balance marks here as well!
3. Lay the soles together like a hamburger, the fleece in the middle and the right side main fabric out. Hold the soles together by a zig zag around the edge or quick quilted lines along the grain line. My fabric is striped, so I just stitched on the stripes. When you put the soles together with the upper foot, it’s easier if the soles are held together.
4. Sewing the upper foot: lay the fleece piece down on the table first, cover with one main fabric piece, wrong side against the fleece and right side up! Then put the second main fabric piece on, right side against the first main fabric’s right side, so that you are looking at the wrong side. Pin the rectangular opening.

Stitch with our 1 cm seam allowance and cut into the corners.
(why?) I don’t need to remind you to secure the beginning and the end with back tack stitches, right?
Open up the seams by ironing the seam allowance flat.
here are our finished slipper pieces!
—
5. Sew the heel together: Grab your heel ends, opening up the ironed down upper foot slipper piece. Put the ends right side to right side and pin down. Match up the seam you just made. Stitch 1 cm in.

6. Elastic band: With your fingers, pull and press so that the opening seam is located on the fold of the opening. Pin the entire opening and stitch about 1,5 cm down from the folded edge. Leave an opening about 5 cm wide, where the elastic band will be inserted.
7. The elastic band can be tight or loose (again, “it’s not rocket science!”). Fold the slipper and take a piece of elastic band 2x the straight part of the opening, as shown above. You can test how it feels holding it around your foot.
8. Put a safety pin through the elastic band and have a pin ready.

9. Start inserting the safety pin into the opening of the channel and pin down the loose end of the elastic band. Many bad words will be said otherwise 😉 Pull out both ends when you’re through, and tie them together. Stitch the opening close.
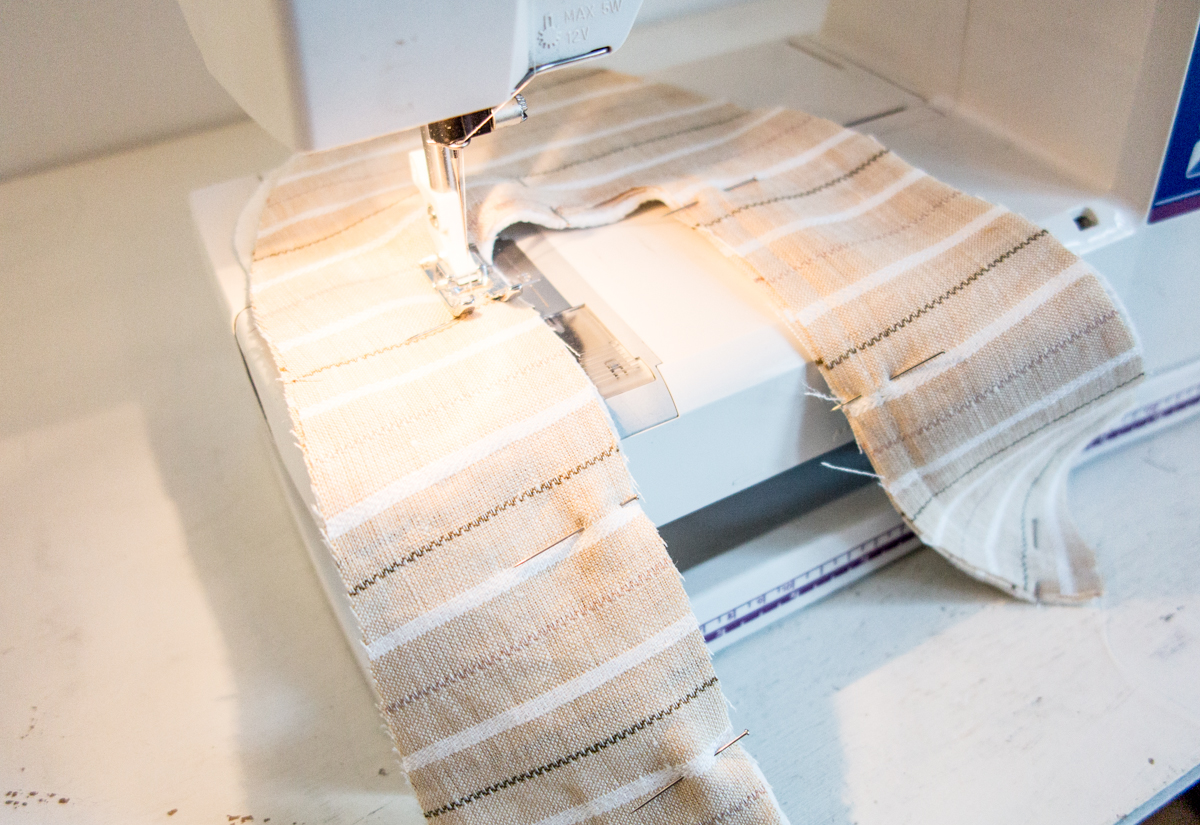
10. It’s finally time to put them together! Start by pinning on the 4 markings: CB, CF, phalanges 1 and 2 and then pin the rest of the layers down. Work carefully! You have 6 layers of fabric here, make sure all of it gets pinned down! Stitch with 1 cm seam allowance.
11. With all these 6 layers, you will probably have a few broken needles and a bit of a messy edge- that’s ok! Take your super sharp scissor and cut 0,5 cm from the edge and all your problems are gone, just like that!
12. Our final step is to finish the inside seam edge. Now, you can do this in a few different ways: you can put a pretty bias binding on it, you can zig zag it or you can use a serger / overlock. (Or if you made these slippers all in fleece or felt you can just forget this step as fleece or felt doesn’t un-ravel!)
13. Last and final step!!
turn.them.inside.out.
you’re done!!!!! You will get a big gold star for this, well done 🙂


These slippers are super cool! I have to try them, they would be perfect for spring!
LikeLike